OPNsense with KPN fiber and iTV
Setup OPNsense with KPN fiber and iTV - without KPN modem in the Netherlands

Introduction
You can use an OPNsense box as a modem for KPN fiber (KPN glasvezel) in the Netherlands. With this setup, you don’t need the KPN modem and you also can make interactive TV (iTV) work. You have full control over your internet connection at home over fiber this way. The setup below places iTV in a separate IoT VLAN. I also have telephony setup, which I will cover in a separate article. I used several resources which I modified to my needs or updated:
KPN splits traffic on the physical in/out (WAN) port by defining 2 VLAN’s there. You’ll have to set this up in your OPNsense interface:
A VLAN with tag 6 for “normal” internet
A VLAN with tag 4 for iTV
The ranges for iTV are 10.0.0.0/8, 213.75.0.0/16 and 217.166.0.0/16. Don’t worry, if you follow the instructions below everything should become clear.
Hardware and software
You need decent hardware for your OPNsense box, as KPN fiber uses PPPoE: this requires a fast enough CPU, especially single-core performance is important. I use a Protectli VP2420 which is fast enough for 1 Gbit/s fiber up and down with iTV and telephony. At the time of writing I’m using OPNsense version 25.1 which is based on FreeBSD 14.2-RELEASE.
Installation
IoT VLAN on main LAN
If you want to follow this guide to the letter, you should create a IoT VLAN on your main LAN interface first (Interfaces-Devices-VLAN) and give it access to the internet and of course shield it of from the rest of your LAN. How to do this is beyond the scope of this article. You could also place the KPN iTV devices in your main LAN, but keep in mind that you should adjust some of the steps below. The IoT VLAN I created is called VL_IoT, but you can give it any name.
Create VLAN’s on main interface (WAN)
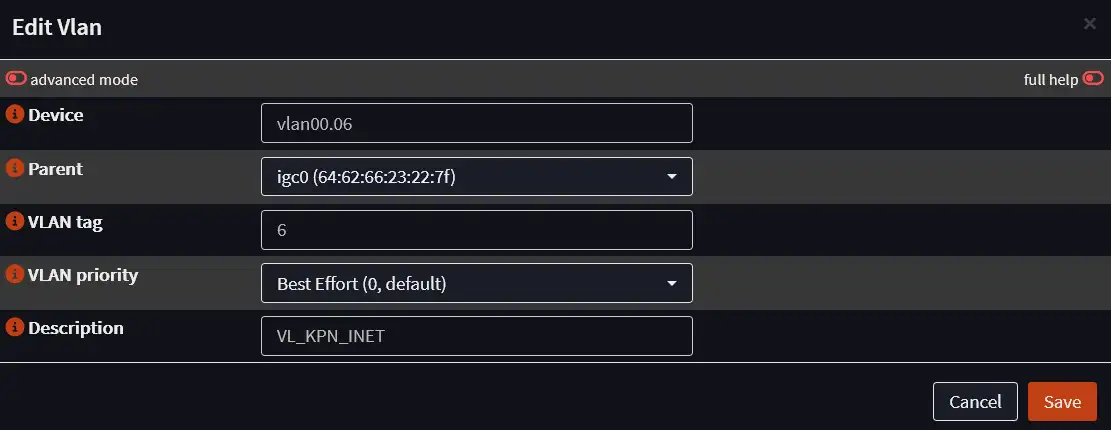
Go to Interfaces-Devices-VLAN and create 2 VLAN’s on the main (WAN) interface of your OPNsense box.
| Device | vlan00.06 |
|---|---|
| Parent | The interface where the WAN cable goes |
| VLAN tag | 6 |
| VLAN priority | Best Efford (0, default) |
| Description | VL_KPN_INET |
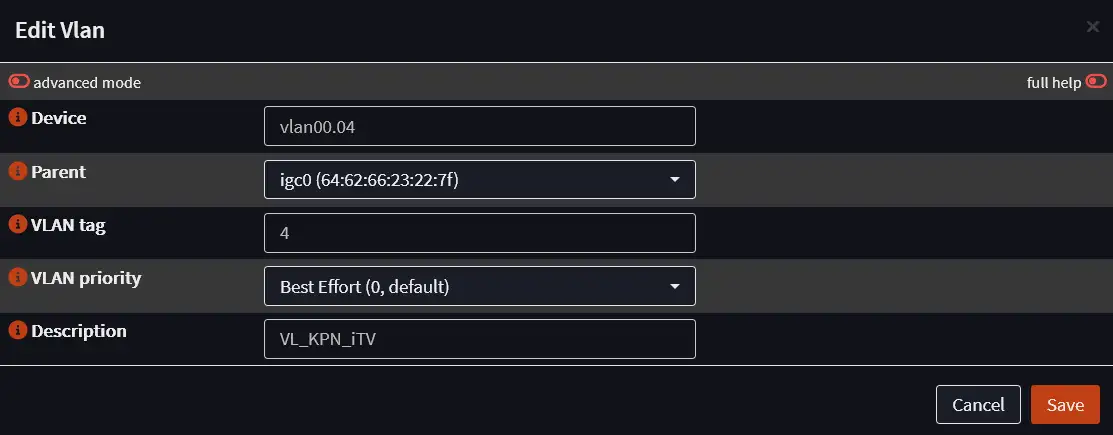
| Device | vlan00.04 |
|---|---|
| Parent | The interface where the WAN cable goes |
| VLAN tag | 4 |
| VLAN priority | Best Efford (0, default) |
| Description | VL_KPN_iTV |
Assign interfaces to newly created VLAN’s
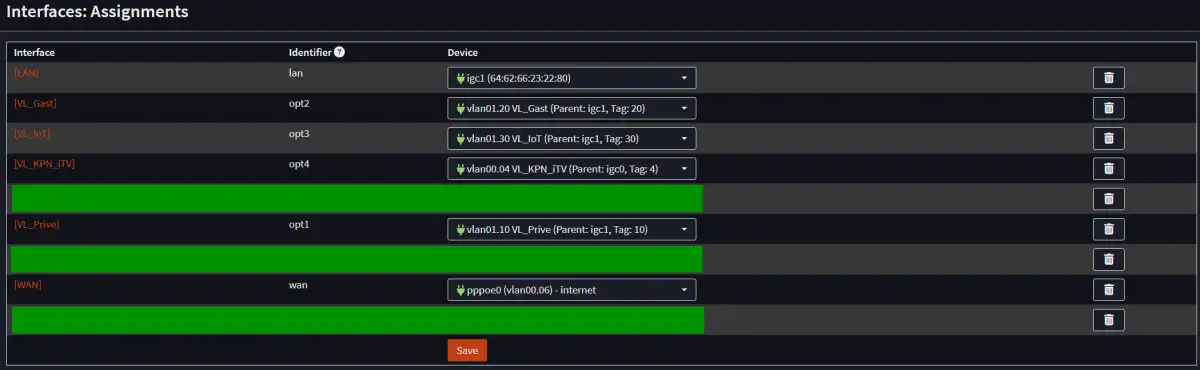
You can find Interface Assignments under Interfaces-Assignments:
Assign WAN to the newly created VLAN with tag 6 (vlan00.06 in this example)
Assign a new interface to the newly created VLAN with tag 4 (vlan00.04 in this example)
In the screenshot below you will see I have more VLAN’s in my setup. You will also see that the name of the Device in WAN is different from what you will see at home: that is because I already setup PPPoE here ealrier (I made the screenshot later) , we will setup PPPoE in the next step. As long as you select the right VLAN (with tag 6) you are good to go. Save and go to the next step.
Configure WAN interface
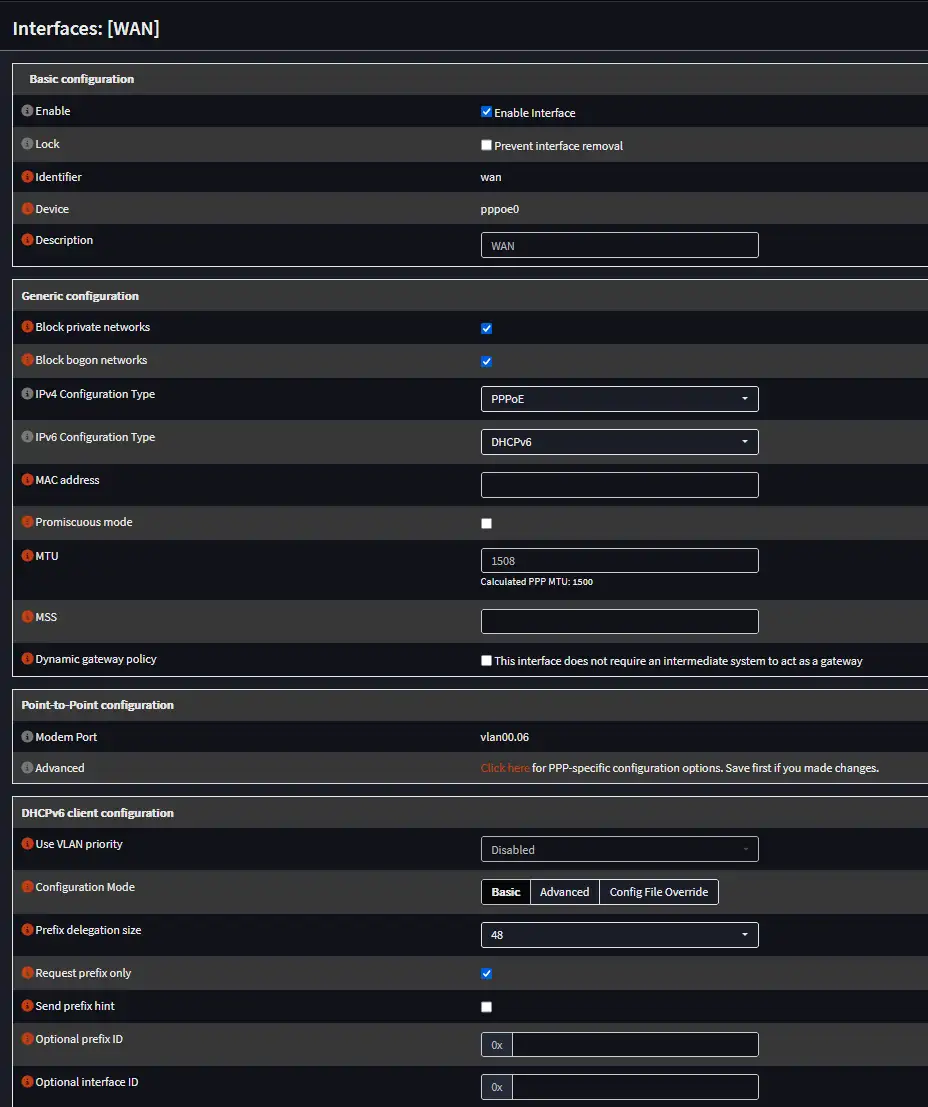
Under Interfaces-[WAN] (leave everything else unchanged):
Note: The MTU of 1508 here ensures the PPPoE connection is 1500, which is supported by KPN.
| Enable | Checked |
|---|---|
| Description | WAN |
| Block private networks | Checked |
|---|---|
| Block bogon networks | Checked |
| IPv4 Configuration Type | PPPoE |
| IPv6 Configuration Type | DHCPv6 |
| MTU | 1508 |
| Use VLAN priority | Disabled |
|---|---|
| Configuration Mode | Basic |
| Prefix Delegation Size | 48 |
| Request prefix only | Checked |
| Send prefix hint | Unchecked |
Click Save and Apply Changes
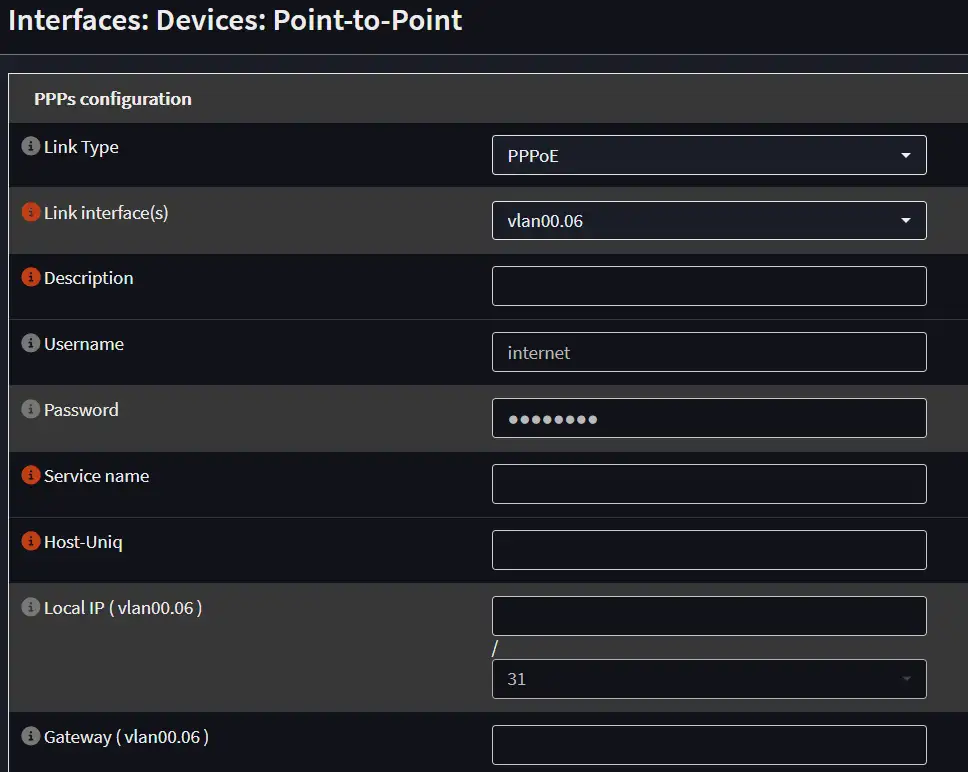
Then in the same window under Point-to-Point configuration under Advanced click on the text that says: Click here for PPP-specific configuration options. Save first if you made changes. You can also reach this configuration by going to: Interfaces-Devices-Point-to-Point.
Click on the + sign and add the following information (leave the rest alone)
The username and password are not important, you can fill in anything.
| Link Type | PPPoE |
|---|---|
| Link interface(s) | vlan00.06 |
| Username | internet |
| Password | internet |
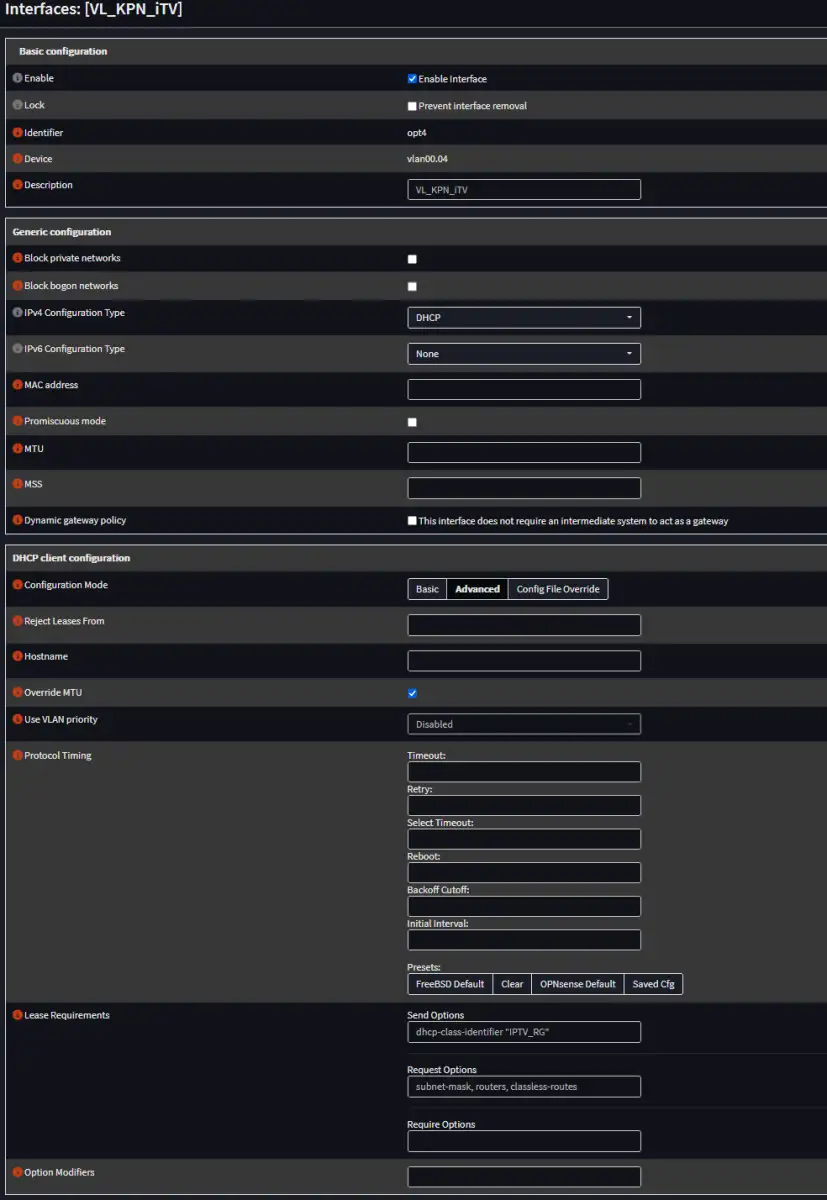
Configure iTV interface
Under Interfaces-[VL_KPN_iTV] (leave everything else unchanged):
| Enable | Checked |
|---|---|
| Description | VL_KPN_iTV |
| Block private networks | Unchecked |
|---|---|
| Block bogon networks | Unchecked |
| IPv4 Configuration Type | DHCP |
| IPv6 Configuration Type | None |
| Configuration Mode | Advanced |
|---|---|
| Lease Requirements - Send Options | dhcp-class-identifier "IPTV_RG" |
| Lease Requirements - Request Options | subnet-mask, routers, classless-routes |
NB: The quotes are required under Send Options
Firewall settings
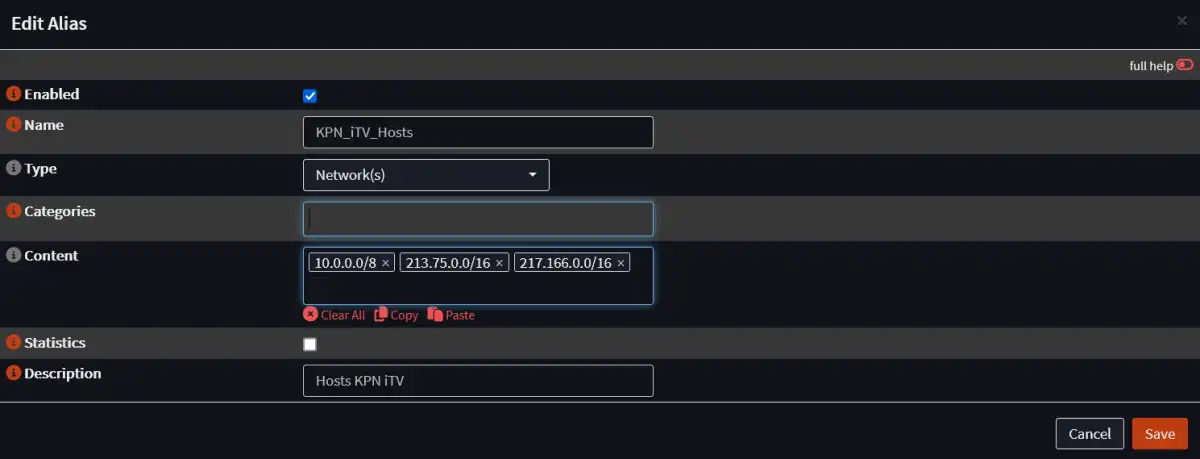
Under Firewall-Aliases make an alias for KPN iTV hosts and click Apply:
| Enabled | Checked |
|---|---|
| Type | Network(s) |
| Content | 10.0.0.0/8 213.75.0.0/16 217.166.0.0/16 |
| Description | Hosts KPN iTV |
Firewall rules IoT interface
Under Firewall-Rules-VL_IoT (or whatever your IoT VLAN is called) make 2 new rules:
| Action | Pass |
|---|---|
| Interface | VL_IoT (or whatever your IoT VLAN is called) |
| Direction | in |
| TCP/IP Version | IPv4 |
| Protocol | IGMP |
| Source | any |
| Destination | any |
| Description | KPN iTV - allow IGMP |
| allow options | Checked |
| Action | Pass |
|---|---|
| Interface | VL_IoT (or whatever your IoT VLAN is called) |
| Direction | in |
| TCP/IP Version | IPv4 |
| Protocol | any |
| Source | any |
| Destination | KPN_iTV_Hosts |
| Description | KPN iTV - allow access to KPN iTV hosts |
| allow options | Checked |

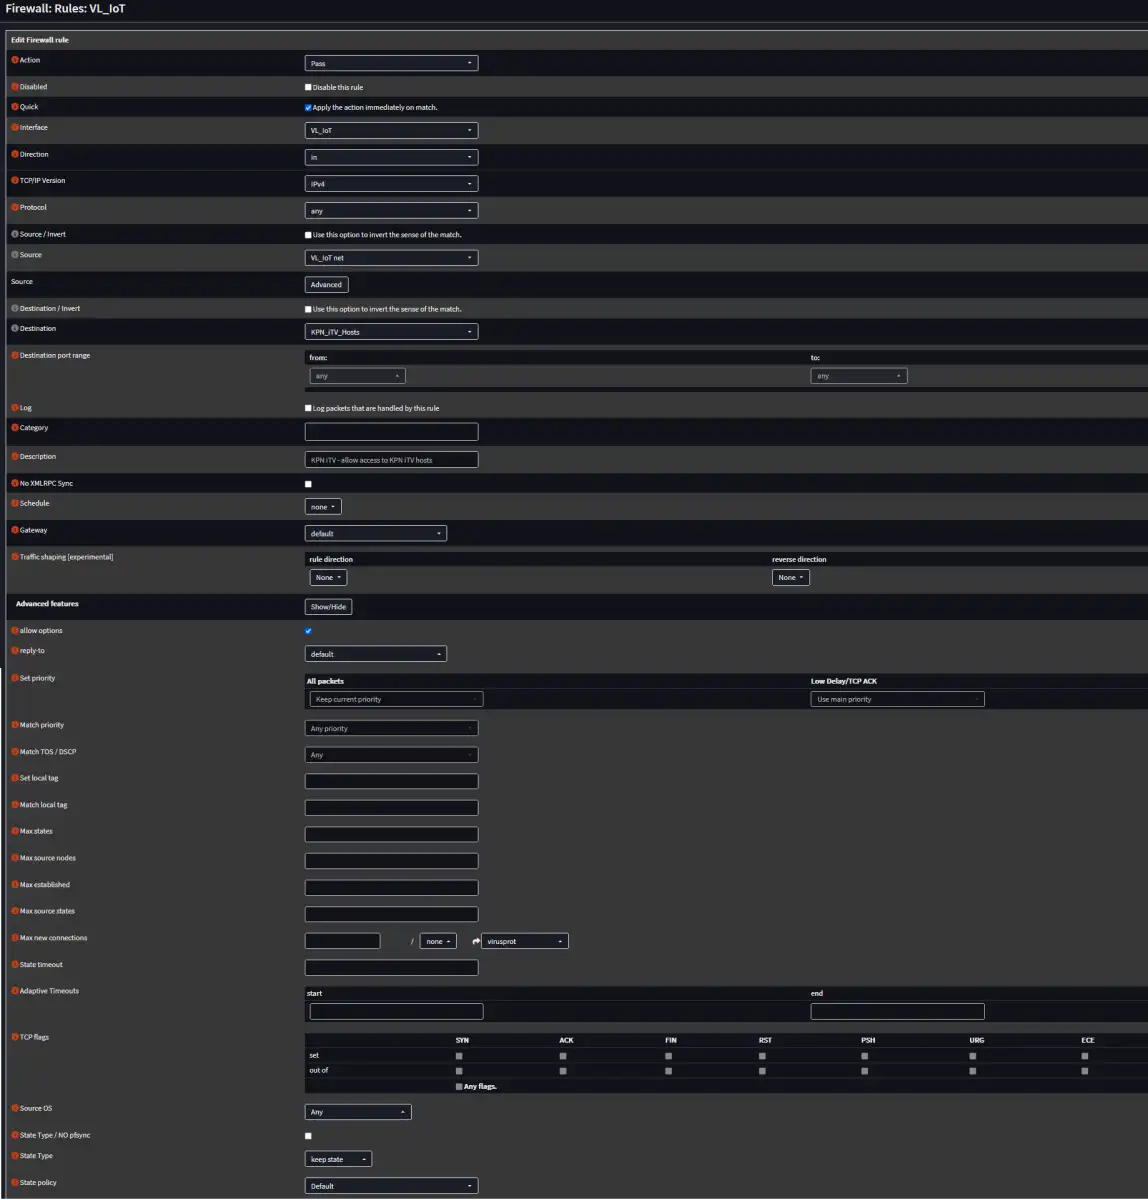
The end result is then:

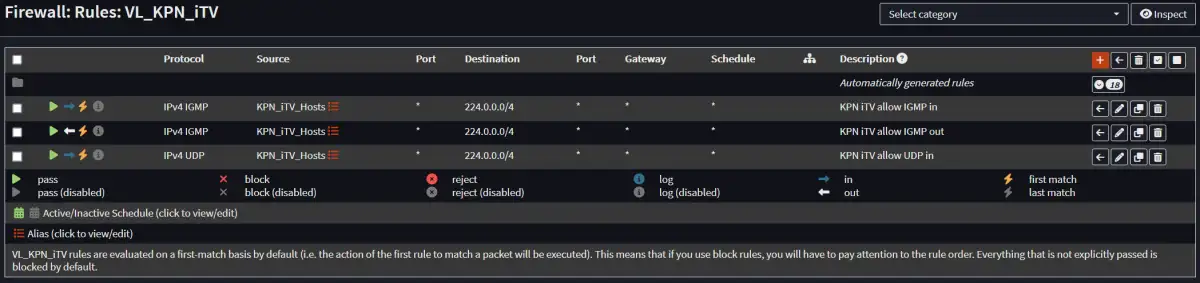
Firewall rules KPN_iTV interface
Under Firewall-Rules-VL_KPN_iTV make 3 new rules:
| Action | Pass |
|---|---|
| Interface | VL_KPN_iTV |
| Direction | in |
| TCP/IP Version | IPv4 |
| Protocol | IGMP |
| Source | KPN_iTV_Hosts |
| Destination | 224.0.0.0/4 |
| Description | KPN iTV allow IGMP in |
| allow options | Checked |
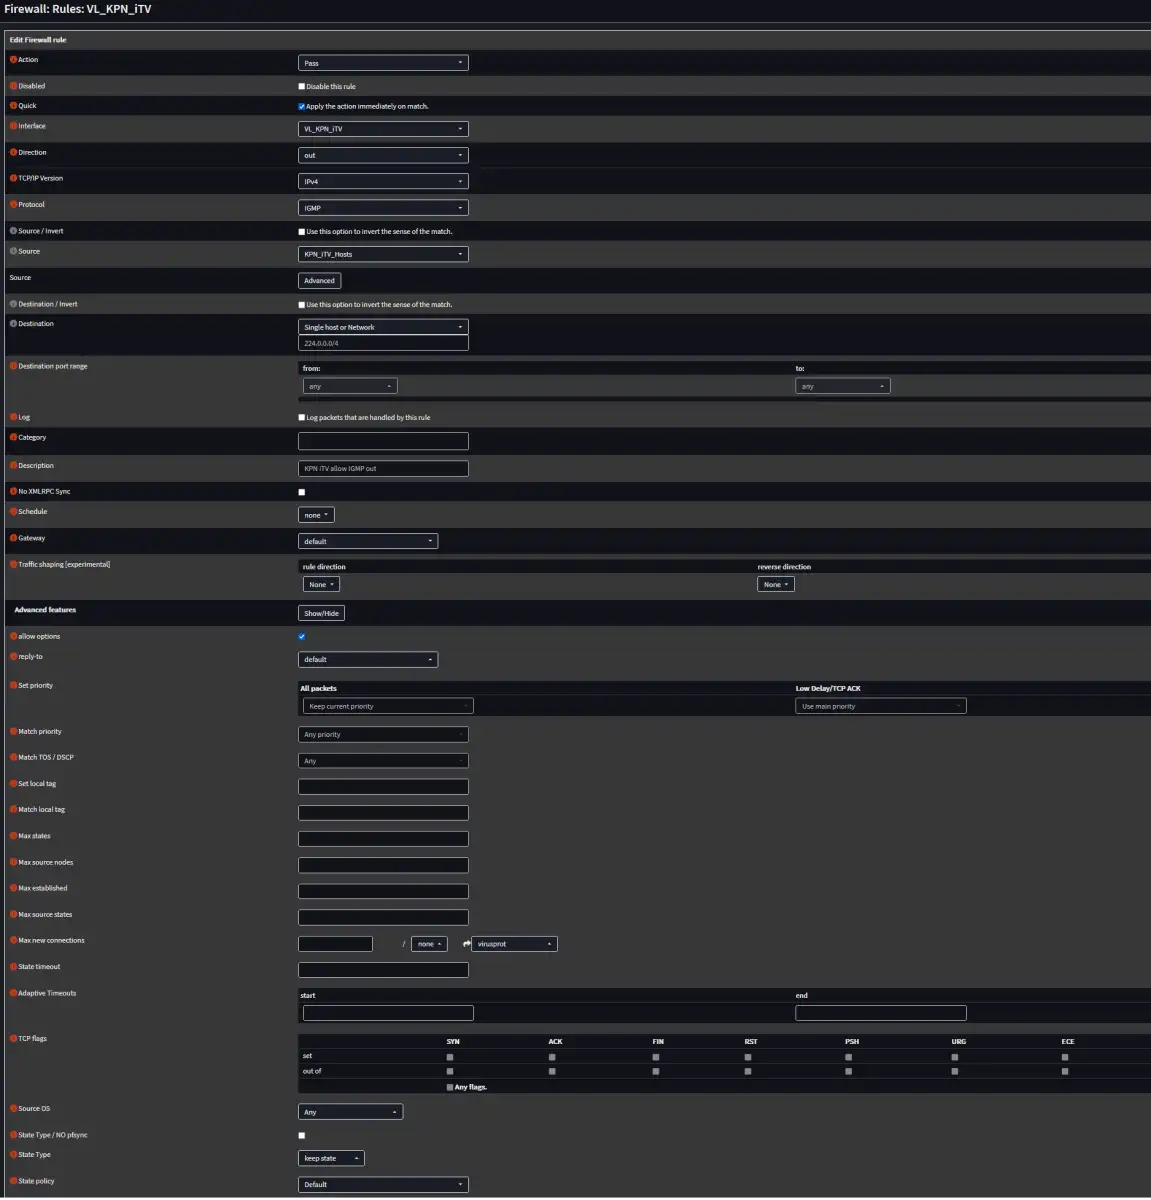
| Action | Pass |
|---|---|
| Interface | VL_KPN_iTV |
| Direction | out |
| TCP/IP Version | IPv4 |
| Protocol | IGMP |
| Source | KPN_iTV_Hosts |
| Destination | 224.0.0.0/4 |
| Description | KPN iTV allow IGMP out |
| allow options | Checked |
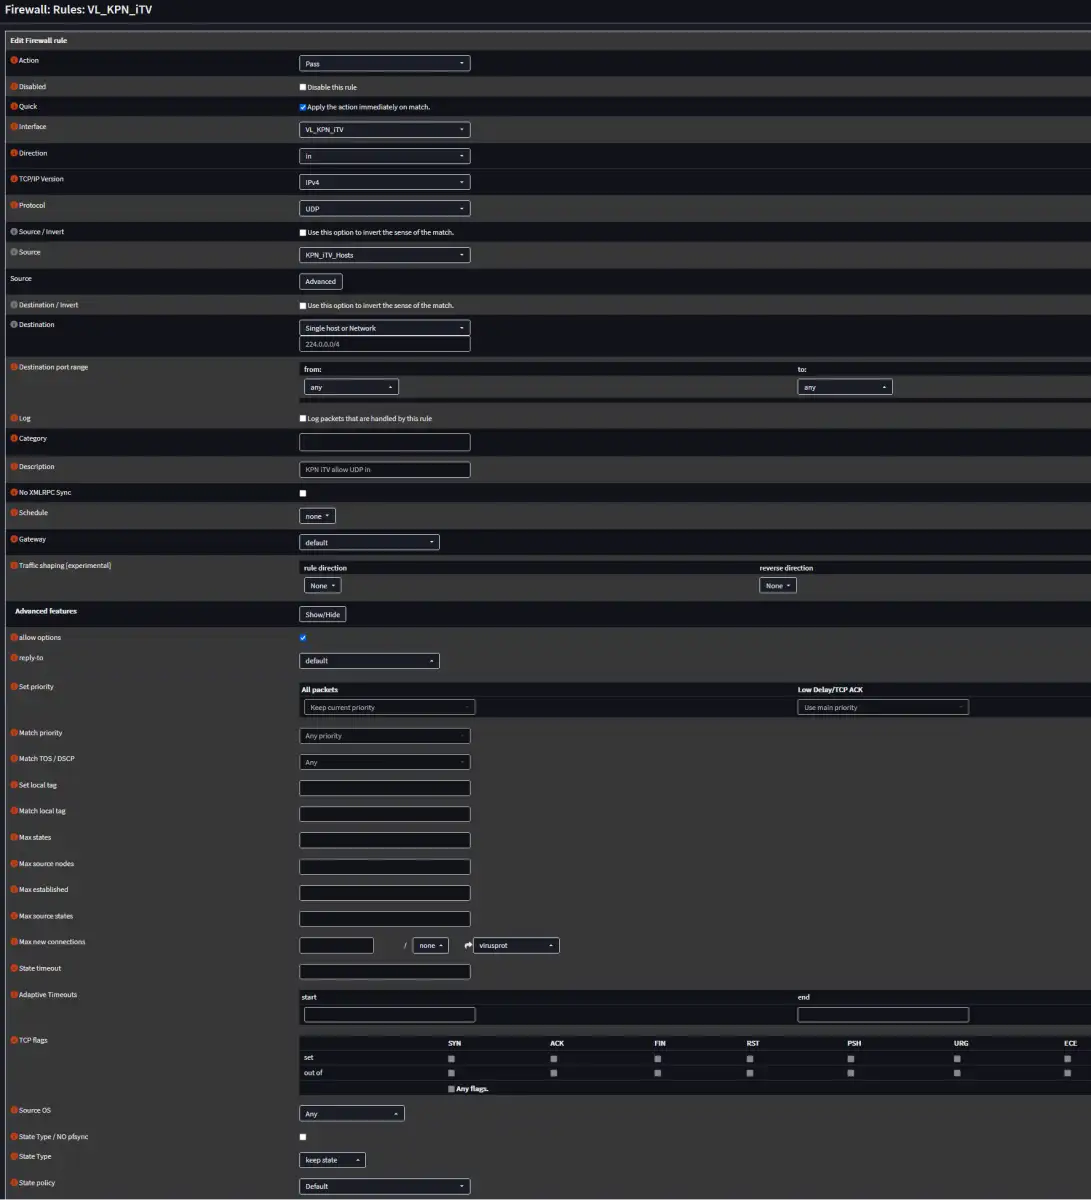
| Action | Pass |
|---|---|
| Interface | VL_KPN_iTV |
| Direction | in |
| TCP/IP Version | IPv4 |
| Protocol | UDP |
| Source | KPN_iTV_Hosts |
| Destination | 224.0.0.0/4 |
| Description | KPN iTV allow UDP in |
| allow options | Checked |

The end result is then:
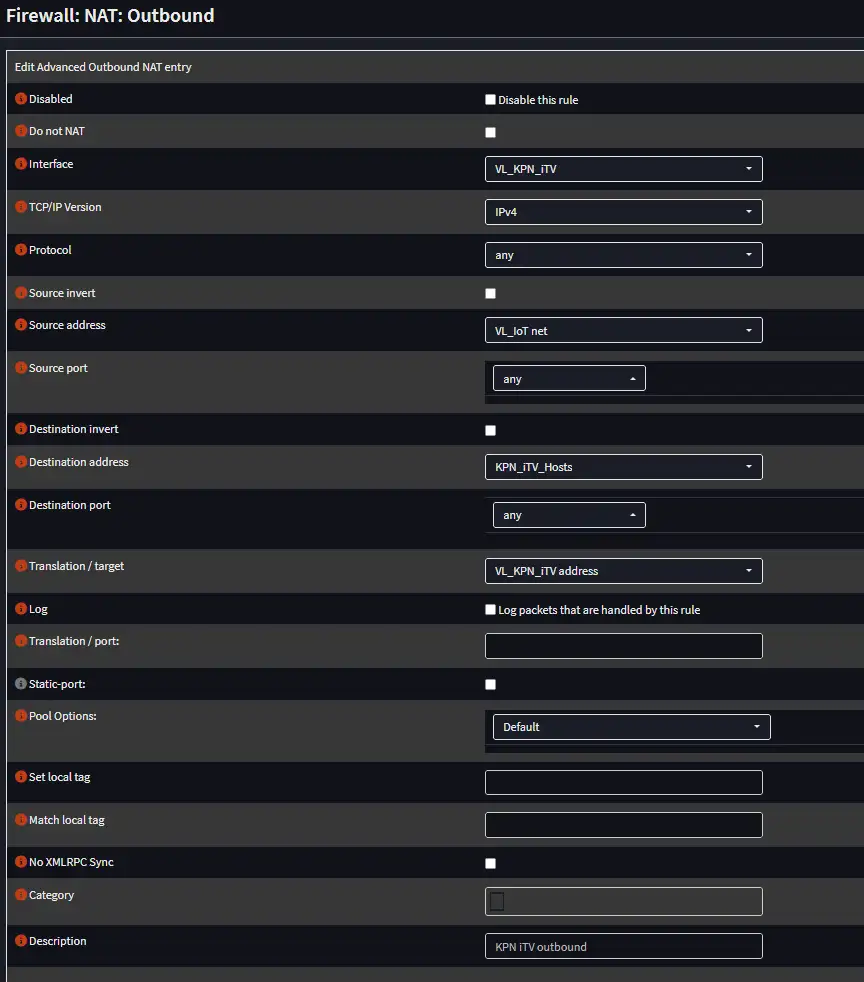
Firewall NAT outbound rules
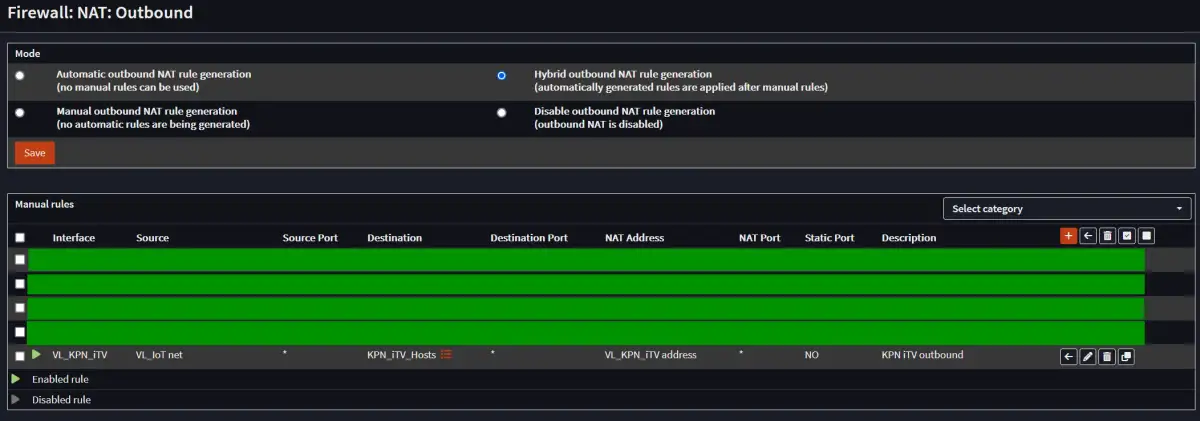
Under Firewall-NAT-Outbound:
First check Hybrid Mode and Save.
Make a new Outbound Rule:
| Interface | VL_KPN_iTV |
|---|---|
| TCP/IP Version | IPv4 |
| Protocol | any |
| Source address | VL_IoT net (or whatever your IoT VLAN is called) |
| Destination address | KPN_iTV_Hosts |
| translation/target | VL_KPN_iTV address |
| Description | KPN iTV outbound |
The end result is then:
IGMP Proxy
KPN uses multicast to deliver TV streams. To direct this traffic you should use IGMP Proxy. Furthermore, your switch(es) should support IGMP Snooping and of course you must enable it in the settings of your switch(es). The iTV boxes will switch to unicast if you don’t enable this (but it will still work as far as I know). Switching channels will be faster with this enabled.
To use it, you must install a plugin in OPNsense called IGMP Proxy.
Navigate to System-Firmware-Plugins
Find os-igmp-proxy and install it
Navigate to Services-IGMP Proxy and add an upstream and a downstream rule using the + sign:
| Interface | VL_KPN_iTV |
|---|---|
| Description | KPN iTV |
| Type | Upstream Interface |
| Network(s) | 10.0.0.0/8 213.75.0.0/16 217.166.0.0/16 |
| Interface | VL_IoT (or whatever your IoT VLAN is called) |
|---|---|
| Description | KPN iTV |
| Type | Downstream Interface |
| Network(s) | 172.16.30.0/24 (or whatever the subnet of your IoT VLAN is) |
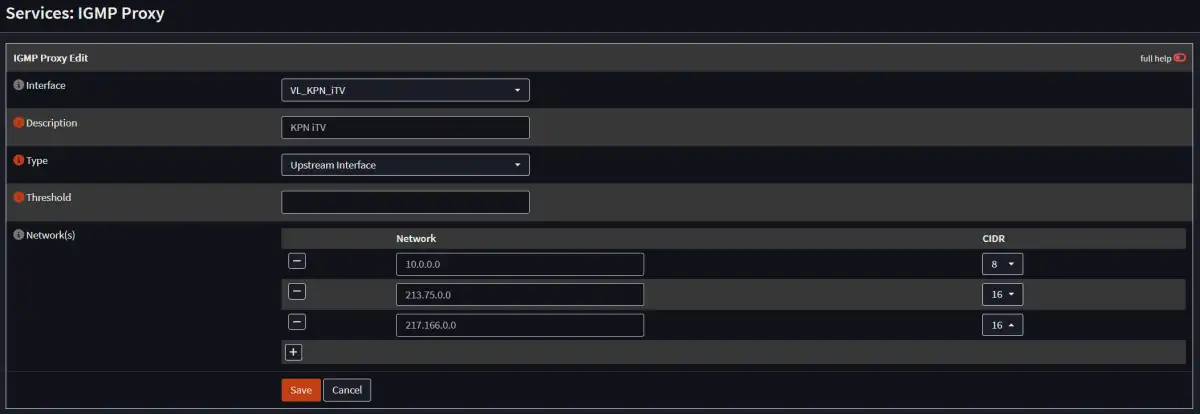
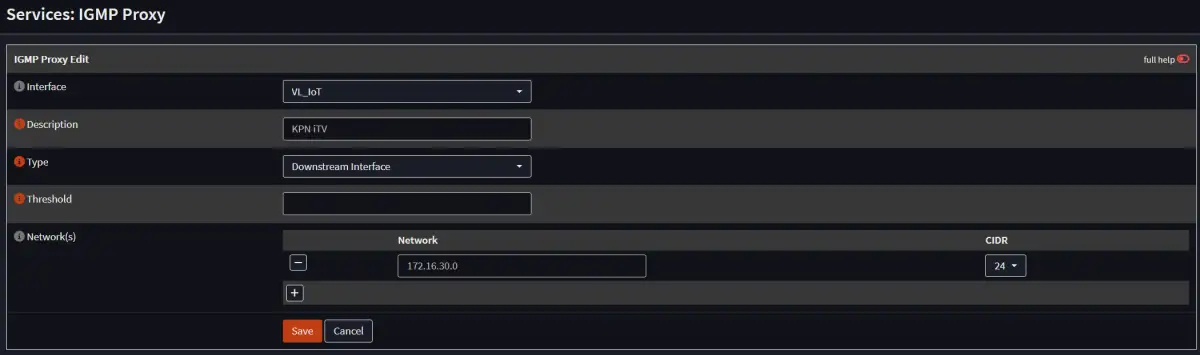
The end result is then:

Conclusion
You should add your iTV boxes to the IoT VLAN.
You should now have working internet and iTV on KPN fiber.